Hide Author Name In Blog Posts WordPress

Yes! There's a solution to your search: "hide author name in blog posts WordPress." But What is it, and why? WordPress is a familiar tool for writers. This Content Management System provides many advantages for the authors, whether for personal or organizational use. However, sometimes, someone would like to hide the author's name from blog posts on WordPress. This thing may occur due to a variety of reasons. For example, a publication wants to reduce the complexity of maintenance of credits to its blog posts.
Moreover, there might be many reasons, like maintaining anonymity, creating a uniform look, or running a multi-author blog. Therefore, hiding the author's name in blog posts is not relatively easy. However, there are specific methods to do it without facing any complexity.
The use of a CSS code or a plugin can help with the process of removing an author's name from WordPress blog posts. The explanation of these methods has been shared in this write-up.
A WordPress Author: Role And Significance
Before moving to the section that deals with the author's name and the need to remove it, one should know the basics of the role of the WordPress author. Here are the main factors about the author's name in WordPress.
- A WordPress author is a person who has access to the account to edit posts and do more. They can access the login credentials, such as the username and password.
- They are the people who hold the required authority and hand over the responsibility to one person instead of multiple and undeserving people.
- Although they can publish, edit, insert images, and view comments on the posts already published on the specific WordPress account, they can't have access to the plugins, themes, and other individual settings of the page.
- The management of a multiple-author-dependent WordPress platform might be tricky. That's why one may need the control to change the author's name.
- Authors can be added or removed from a WordPress website. Therefore, those with access to the account should know how to add and delete the authors on a WordPress website.
These are the main factors to be known about a WordPress author. The following section will discuss changing the author's name in WordPress.
Reasons to hide an author's name in WordPress blog posts
Although the metadata for the author's name shows details about the author, categories, taxonomies, date of publication, and author name.
Sometimes, several reasons may motivate one to hide the author's name. The first reason for this step is not to applaud a single author if it's a multi-author platform.
Moreover, one can face this situation due to the nature of the blog. If the blog post seems controversial, the author's name must be hidden. Therefore, this is also a significant reason to hide the author's name.
An author may have often left the content hub, and the publication owner may want to hide the name and publish the post under a different author's pen name.
Moreover, the owner of the blog may want to maintain a kind of style and consistency. Therefore, they may consider removing the names of the individual authors.
Methods To Remove An Author's Name In WordPress
There are various methods to remove or hide the author's name. Based on the requirement, either one can use no-coding methods, editing the WordPress theme files, or any other method.
However, it is also a separate thing
Using WPCode Plugin To Hide Author's Name
If you want a simple and no-coding process, try using a plugin. Here are the steps to use a plugin for hiding the author's name.
Go to the plugins section. Click on Add New and look for WPCode Plugin. The next step focuses on the installation and activation of this plugin.
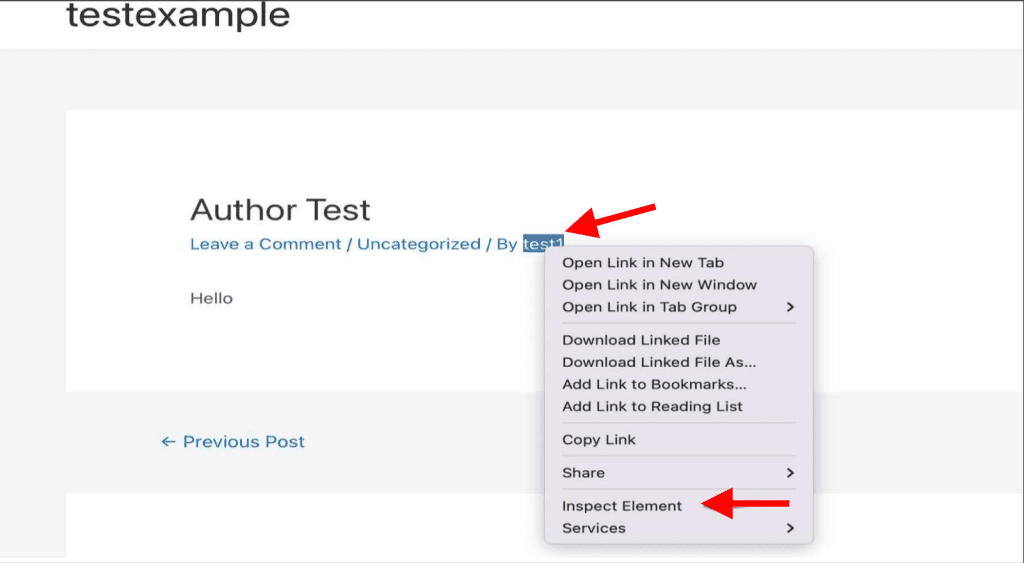
Open the page which has an author's name. Then, right-click on the menu. Next, select the 'inspect' option. This action would show all the codes that your WordPress website uses.
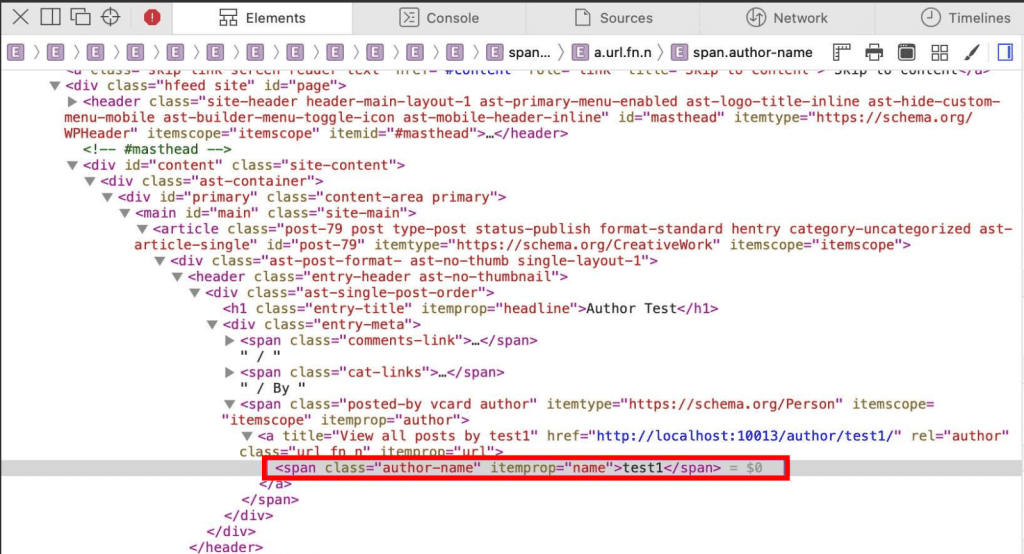
Use the arrow icon to reach the author's name. You can find the authors in the right-hand side panel.
Once this plugin gets activated, it automatically erases all the desired information.
This plugin uses CSS to hide the details from the front, while PHP hides the details from the back end. However, using PHP removes the access of search engines to the information.
Save the required changes by clicking on 'Save Post.' The author's name won't be visible on the page.
Use The Schema Markup
You can use the Schema Markup to remove the author's name in WordPress blogs. However, there is a code that you need to follow to complete this step. The code that would you need to follow is here.
/**
 * Filter to change the schema data.
 * Replace $schema_type with schema name like article, review, etc.
 *
 * @param array $entity Snippet Data
 *
 * @return array
 */
add_filter(“rank_math / snippet / rich_snippet_{$schema_type}_entity”, function ( $entity ) {
    if ( isset( $entity['author'] ) ) {
        unset( $entity['author'] );
        return $entity;
    }
    return $entity;
});
However, you must add your choice to the schema type option to modify the object type.
Use A Generic Name Of The Author
It's unnecessary to use a separate plugin, code, or any other method to hide the author's name. There is another option to do the same without using the real name.
This method is the best for a team where there are many contributors. However, the condition for this step is to have a consistent and distinct writing style. The presence of the same style ensures consistency while reading and publishing in the long term.
The process to add a new name is very simple. Go to the user's option, select add new, create a new username, and fill in the required details. Choose the user role and add a new user.
Go to the navigation option and select all users. Edit the username and enter the name you want. Select the nickname that you mentioned as the public name.
Lastly, update the user button, and all the changes save automatically.
Edit The WordPress Theme Files
By editing the WordPress theme, it is possible to remove the author's name automatically. A user needs some coding knowledge and familiarity with WordPress.
You must locate and delete the responsible code for displaying the author's name in blog posts. The most famous locations for these names are single.php, content.php, archive.php, and index.php.
However, one should also find other locations to get the required names of the files. Thus, here is the code you need to use to remove the author's name.
function twenty_twenty_one_posted_by() {

}
Finally, you can click the update file option to save the required changes.
Use The CSS Code To Remove The Author's Name
You can remove the author's name from posts using the knowledge of CSS coding language. You need to navigate to the posts and select the author's name. Find the HTML element with the author's name and another label in the elements tab.

You can hover on the elements tab and find the author's name in the highlighted condition.

You need to use the code snippet below to hide the author's name.
.author-name{
display: none;
}
Now, you can see that the author's name would have been removed.
Using Block Theme
If you use the block-enabled WordPress themes, you should consider removing the author's name from the templates. Head to the themes section and go to the editor option.
Remove the name from the index, archive template, and single template. It is dependent on the theme that you have used.
Then, WordPress opens a preview of that template and sees the author's name. Click on the pencil icon and edit the name. Click on the option for the post-author block.
You can save the changes and will be able to see that the name has disappeared from the post.
Use New Name On A Single Post
If you intend to change the author's name on a single post, you must use some builders to do this operation. Select the document tab and choose the status and visibility.
Select the author option and select the name of the previous author. Update it and save the button for the single post.
Changing The Name For Multiple Posts At Once
You should create a new user as the first step. Change the name of the user for editing the settings of multiple users. Here are the steps for the same.
Select the add new option. You can select all users to apply this operation to all pages simultaneously.
Edit the link given below to add the new username that you have created. Go to the user profile and enter the name that you need to mention over there.
Choose the option to display the name publicly. Open the drop-down menu, and users can create a bio for a new account of the users.
Go to the option for all posts and click on the option for top screen options. Now you can see that the username has changed.
Conclusion
Using the WordPress blogger platform for publishing is a modern-day tactic to introduce content management practices smoothly. However, one may often not want to show the author's name in blog posts.
Many reasons push an author or a publication to go anonymous. However, it can also be due to the need to hide the identity, including several authors and other factors.
Therefore, this write-up has shared some crucial methods to hide the author's name. The author or owner of the blogging platforms may use these methods to hide the author's name, no matter the reason.


