
Joomla PHP.ini Settings – Ultimate Guide

Joomla, one of the most versatile content management systems, powers millions of websites worldwide. While Joomla’s core codebase is already optimized for performance, certain server-side configurations, especially PHP.ini settings, can further enhance your website's speed and functionality.
In this guide, we'll explore some of the best PHP.ini adjustments for enhancing Joomla's performance. But before diving into the modifications, let's first identify the file's location and understand how to modify it.
Where can I find Joomla php.ini file?
The php.ini file is a critical configuration file for PHP, used by servers to control the PHP settings. In Joomla, you don't directly edit the php.ini file through the CMS, but Joomla does allow you to view your server's PHP settings.
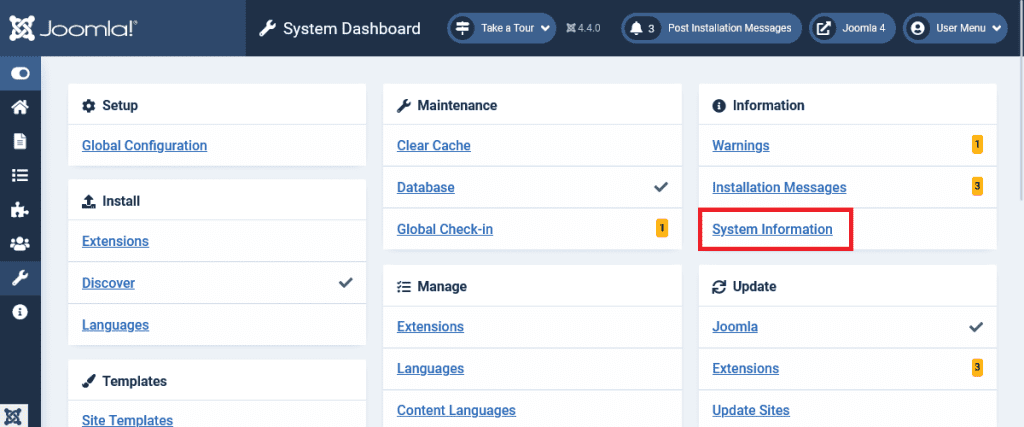
Joomla's System Information Tool:
- Once you've logged into your Joomla backend, navigate to 'System' in the left menu.
- Click on 'System Information'.
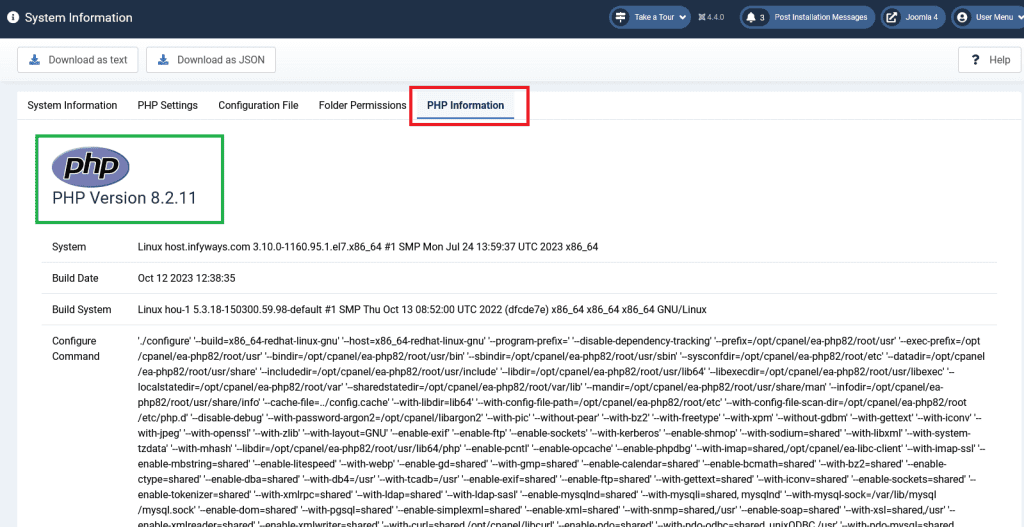
- Navigate to the 'PHP Information' tab. Here, you'll find details about your server's PHP configuration, including the settings from the
php.inifile.
Direct Access via Hosting Account:
- If you have access to your hosting account (e.g., cPanel, Plesk, or direct server access), you can find and edit the
php.inifile directly. - In cPanel/WHM, for instance, there's a "Select PHP Version" option, and from there, you can manage some of the PHP settings.
- For those with server access, the
php.inifile is usually located in theetcdirectory. Its location can vary depending on server configuration and PHP installation.
🔍 Tip: For optimal performance, Joomla 4 recommends using PHP 8.2, though it can run on a minimum of PHP 7.2.5. As for Joomla 5, it requires at least PHP 8.1.0 with PHP 8.2 as the recommended version. More technical details here.
How to edit PHP.ini using WHM?
The MultiPHP INI Editor in WHM (Web Host Manager) is a tool that allows you to configure PHP settings for different versions of PHP installed on your server. You can use it to edit the php.ini file for each PHP version.
Here's a step-by-step guide on how to edit the php.ini file using the MultiPHP INI Editor in WHM:
- Log in to WHM:
- Navigate to your WHM login page, typically found at
https://your-server-ip:2087orhttps://your-domain.com:2087. - Enter your WHM username and password to log in.
- Navigate to your WHM login page, typically found at
- Navigate to MultiPHP INI Editor:
- In the left sidebar, search for "MultiPHP".
- Click on "MultiPHP INI Editor" under the "Software" section.
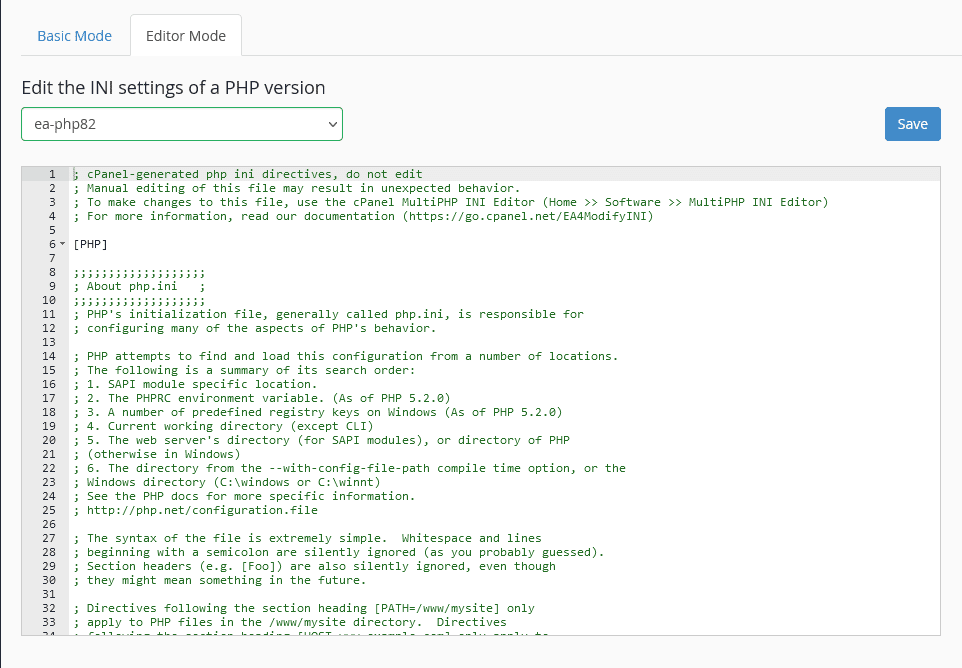
- Choose the PHP Version:
- You'll see two tabs: "Basic Mode" and "Editor Mode".
- "Basic Mode" allows you to adjust common PHP settings using dropdowns and input fields.
- "Editor Mode" provides a text area where you can manually edit the
php.inifile. - For more control, click on the "Editor Mode" tab.
- From the dropdown menu, select the PHP version you want to edit.
- Edit the php.ini File:
- In the text area, you'll see the contents of the
php.inifile for the selected PHP version. - Make the necessary changes to the configuration. Be cautious and ensure you understand the implications of the changes you're making.
- In the text area, you'll see the contents of the
- Save Changes:
- After making your edits, scroll down and click the "Save" button to apply the changes.
- Restart Services (if necessary):
- Depending on the changes you made, you might need to restart the web server (like Apache or nginx) or the PHP-FPM service for the changes to take effect.
- You can do this from WHM or via the command line on your server.
Overriding Default PHP Settings in Joomla
1. Access Your Joomla Root Directory:
First, you need to access your Joomla root directory. You can do this using an FTP client like FileZilla or directly through your hosting cPanel's File Manager.
2. Create or Edit the php.ini file:
- If there isn't already a
php.inifile in your Joomla root directory, you can create one using a text editor. - If there's already a
php.inifile present, you can edit it to add or modify the desired rules.
3. Add Your Rules:
Enter the PHP directives you want to change. For instance:
upload_max_filesize = 64M
post_max_size = 64M
memory_limit = 256M
4. Upload/Save the File:
If you've created the php.ini file offline, upload it to your Joomla root directory using the FTP client. If you're working directly through the cPanel File Manager, simply save the file.
5. Test Your Changes:
After making your adjustments, it's essential to ensure they've taken effect. You can do this by:
- Checking the PHP settings from within Joomla's backend (System > System Information > PHP Information).
- Creating a simple PHP file, say
info.php, with<?php phpinfo(); ?>and uploading it to your root. Accessing this file via your browser will display all PHP configurations.
Important Points to Note:
- Some hosting providers might not allow overriding the server's
php.inisettings using this method. In such cases, you'll need to contact your hosting support. - Alternatively, on some servers, you might have to use a
.user.inifile instead of aphp.inifile for overrides, especially on servers running PHP as CGI/FastCGI. - Always backup your site before making changes. This ensures you can quickly revert if something goes wrong.
Configuring php.ini in XAMPP:
1. Locate the php.ini File:
Navigate to the directory where XAMPP is installed. By default, on Windows, this would typically be C:\xampp. For macOS, it might be in the Applications/XAMPP directory. Within the XAMPP directory, navigate further to php. Here, you'll find the php.ini file.
2. Backup the Original File:
Before making any changes, it's a good practice to create a backup of the original php.ini file. This way, if something goes wrong, you can always revert to the original settings.
3. Edit the File:
Open php.ini using a text editor of your choice, such as Notepad++ or Sublime Text. Once open, you can modify any settings as required. Some common changes include adjusting the upload_max_filesize, post_max_size, and memory_limit values.
4. Search Efficiently:
The php.ini file can be quite extensive. Using the "search" or "find" function (usually Ctrl + F or Cmd + F) in your text editor can help you quickly locate the specific directives you want to change.
5. Save and Restart:
After making your desired changes, save the php.ini file and close it. For the changes to take effect, you must restart Apache. You can do this via the XAMPP Control Panel by stopping and then starting the Apache service.
6. Verify Changes:
To ensure your changes have been applied, you can:
- Check the PHP settings using the
phpinfo()function. Create a PHP file, for instanceinfo.php, with the content<?php phpinfo(); ?>in your htdocs directory and access it through your browser.
A Few Tips:
- If you're unsure about a particular directive in the
php.inifile, there's usually a comment above it that explains its function. - Remember, any change in the
php.inifile in your XAMPP setup only affects your local environment and not your live site.
Tweaking the PHP.ini file
Memory Limit
One of the most common settings to adjust is the PHP memory limit. This setting determines the maximum amount of memory a PHP script can use.
memory_limit = 256M
While Joomla’s requirements start from 64MB, extensions and plugins might require more. Increasing it to 256M ensures smooth operation for most sites.
Upload File Size
If you often find yourself needing to upload large files, templates, or extensions, you can increase the maximum allowed upload size.
upload_max_filesize = 64M
post_max_size = 64M
The above lines will increase the maximum file upload size to 64MB.
Execution Time
Prevent script timeouts, especially during backups, updates, or data processing.
max_execution_time = 300
Error Reporting
While Joomla has its own error reporting mechanism, you can further refine PHP's error logging.
display_errors = Off
log_errors = On
error_log = /path/to/php-error.log
This ensures that errors aren't displayed to users but are logged for the administrator to review.
Date Timezone
Set the correct timezone for your Joomla site, ensuring timely operations and cron jobs.
date.timezone = "America/New_York"
Replace "America/New_York" with your timezone.
OPCache
OPcache improves PHP performance by storing compiled script bytecode in shared memory, removing the need for PHP to load and parse scripts on each request.
opcache.enable=1
opcache.memory_consumption=128
opcache.interned_strings_buffer=8
opcache.max_accelerated_files=4000
opcache.revalidate_freq=60
opcache.fast_shutdown=1
opcache.enable_cli=1
By enabling OPCache, you can significantly speed up PHP execution times.
Session Settings
To ensure users have a smooth experience, especially when logging in or filling out forms, you should tweak session settings to optimize session management.
session.gc_maxlifetime = 1440
session.save_path = "/path/to/your/session/dir"
session.gc_maxlifetime = 1440
session.save_path = "/path/to/your/session/dir"
session.gc_maxlifetime determines the session garbage collection’s maximum lifetime. A value of 1440 seconds means sessions will be cleaned up after 24 minutes of inactivity. Adjust this according to your site's needs.
Meanwhile, session.save_path defines where PHP session data is stored. Make sure the directory is outside the public_html or www directory to prevent unauthorized access.
Disable Functions
For security reasons, you might want to disable certain PHP functions that can be exploited.
disable_functions = exec,passthru,shell_exec,system,proc_open,popen
This will disable a range of potentially harmful PHP functions, bolstering security.
Resource Limits
Prevent any single PHP process from hogging all server resources.
max_input_time = 60
memory_limit = 256M
max_input_time limits how long a PHP script can take to parse input data, and increasing the memory limit ensures Joomla and its extensions have enough resources.
Conclusion
Customizing the PHP.ini file allows you to harness the full potential of your Joomla site, optimizing both performance and security. While the settings provided above serve as a starting point, it's essential to continuously monitor and adjust them based on your specific needs. Always remember to back up your current PHP.ini file before making changes, so you can easily revert if needed.
Need assistance configuring your Joomla php.ini? Consider our expert Joomla Support Services. We're here to help!


