Complete Guide: Fine-Tune Any LLM 70% Faster with Unsloth (Step-by-Step Tutorial)

Fine-tuning large language models used to be a nightmare. Endless hours of waiting, GPU bills that made me question my life choices, and constant out-of-memory errors that killed my motivation.
Then I discovered Unsloth.
In the past 6 months, I've fine-tuned over 20 models using Unsloth, and the results are consistently mind-blowing. Training that used to take 12 hours now finishes in 3.5 hours. Memory usage dropped by 70%. And here's the kicker – zero accuracy loss.
Today, I'm going to walk you through the complete process of fine-tuning Llama 3.2 3B using Unsloth on Google Colab's free tier. By the end of this guide, you'll have a fully functional, fine-tuned model that follows instructions better than most paid APIs.
Let's dive in.
1. Why Unsloth Crushes Traditional Fine-Tuning Methods
Before we start coding, let me explain why Unsloth is absolutely revolutionary. Traditional fine-tuning libraries waste massive amounts of computational power through inefficient implementations.
Here's what makes Unsloth different:
- Manual backpropagation: Instead of relying on PyTorch's Autograd, Unsloth manually derives all math operations for maximum efficiency
- Custom GPU kernels: All operations are written in OpenAI's Triton language, squeezing every ounce of performance from your hardware
- Zero approximations: Unlike other optimization libraries, Unsloth maintains perfect mathematical accuracy
- Dynamic quantization: Intelligently decides which layers to quantize and which to preserve in full precision
The result? 10x faster training on single GPU and up to 30x faster on multiple GPU systems compared to Flash Attention 2, with 70% less memory usage.
Now let's put this power to work.
2. Setting Up Your Google Colab Environment
First, we need to configure Colab with the right GPU and install Unsloth properly. This step is crucial because Unsloth installation can be tricky if you don't follow the exact sequence.
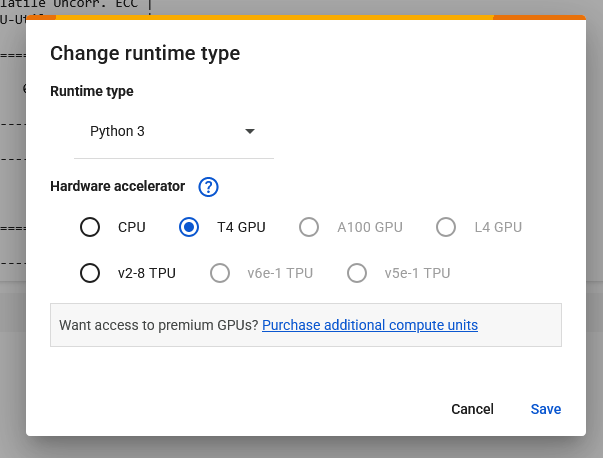
Step 1: Enable GPU in Colab
Go to Runtime → Change runtime type → Hardware accelerator → T4 GPU
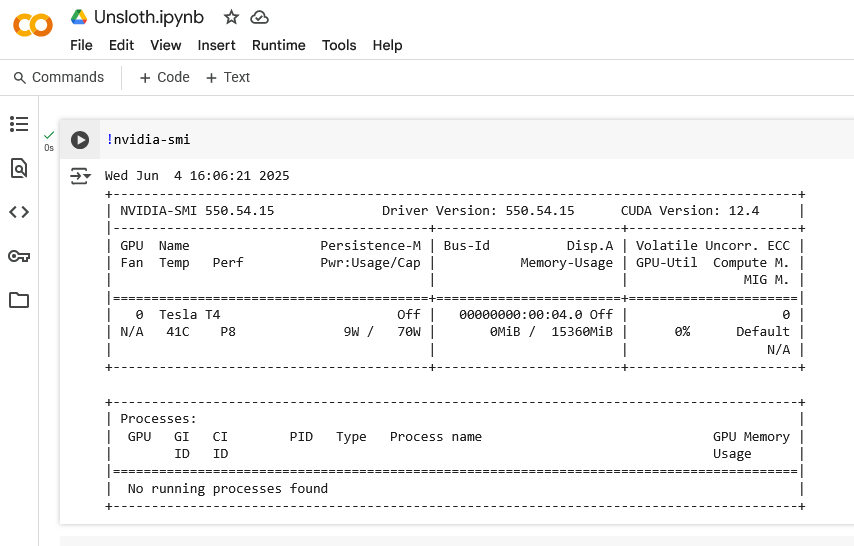
Step 2: Verify GPU availability
!nvidia-smiYou should see a Tesla T4 with ~15GB memory. If you don't see this, restart the runtime and try again.
Step 3: Install Unsloth
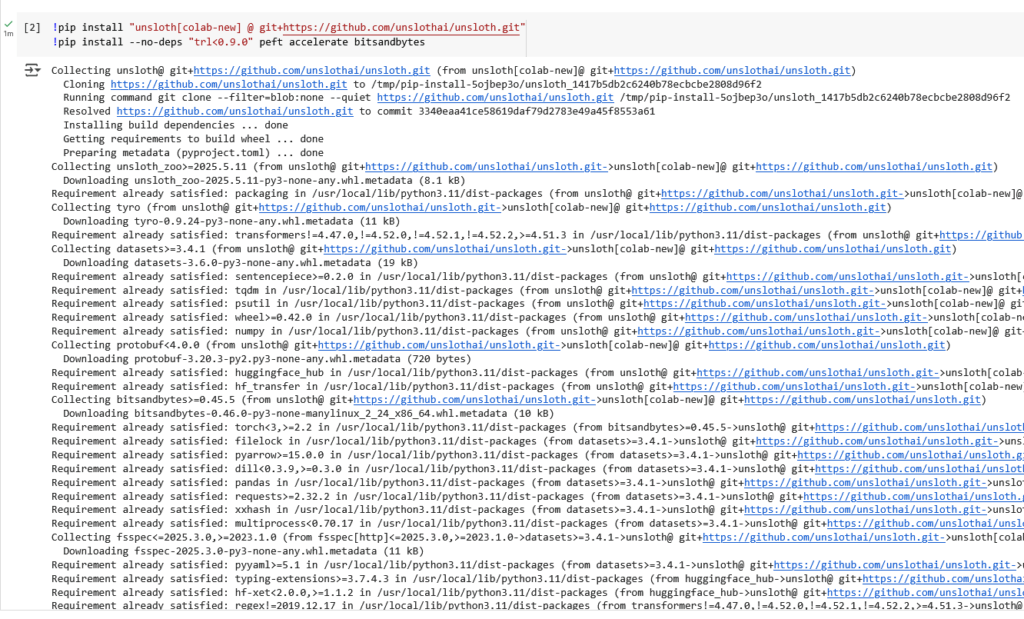
!pip install "unsloth[colab-new] @ git+https://github.com/unslothai/unsloth.git"
!pip install --no-deps "trl<0.9.0" peft accelerate bitsandbytes
Critical note: Don't skip the --no-deps flag. Unsloth has specific version requirements that can conflict with Colab's default installations.
Step 4: Verify installation

import torch
print(f"PyTorch version: {torch.__version__}")
print(f"CUDA available: {torch.cuda.is_available()}")
print(f"CUDA version: {torch.version.cuda}")
If everything installed correctly, you should see CUDA as available with version 12.1+.
3. Loading the Llama 3.2 3B Model with Unsloth
Now comes the magic – loading a 3 billion parameter model in just a few lines of code. Unsloth handles all the complexity of quantization and optimization behind the scenes.
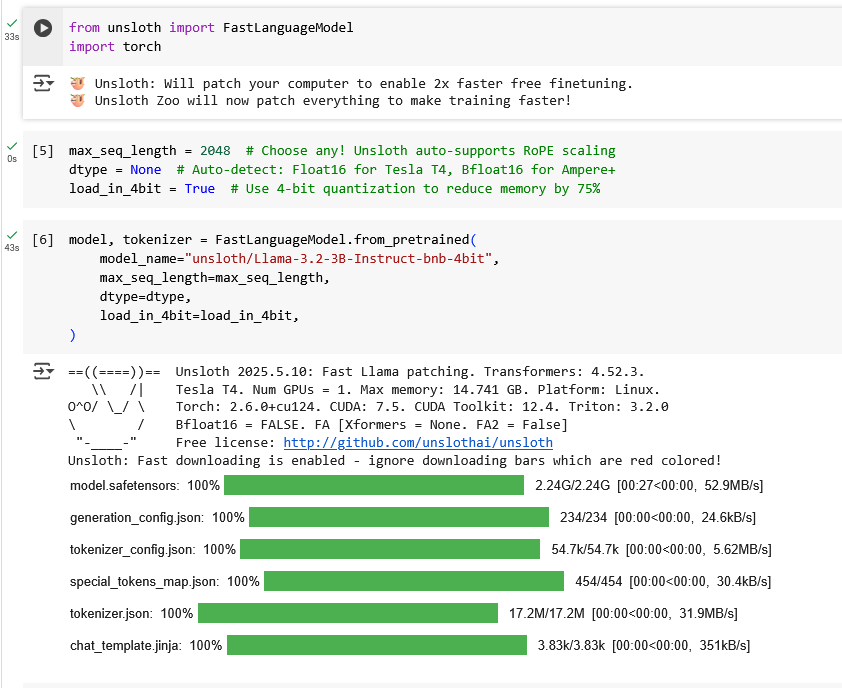
Import required libraries:
from unsloth import FastLanguageModel
import torch

# Configure model parameters
max_seq_length = 2048  # Choose any! Unsloth auto-supports RoPE scaling
dtype = None  # Auto-detect: Float16 for Tesla T4, Bfloat16 for Ampere+
load_in_4bit = True  # Use 4-bit quantization to reduce memory by 75%
Load the model:
model, tokenizer = FastLanguageModel.from_pretrained(
    model_name="unsloth/Llama-3.2-3B-Instruct-bnb-4bit",
    max_seq_length=max_seq_length,
    dtype=dtype,
    load_in_4bit=load_in_4bit,
)
This single command loads a 4-bit quantized version of Llama 3.2 3B that fits comfortably in ~6GB of VRAM instead of the usual 12GB.
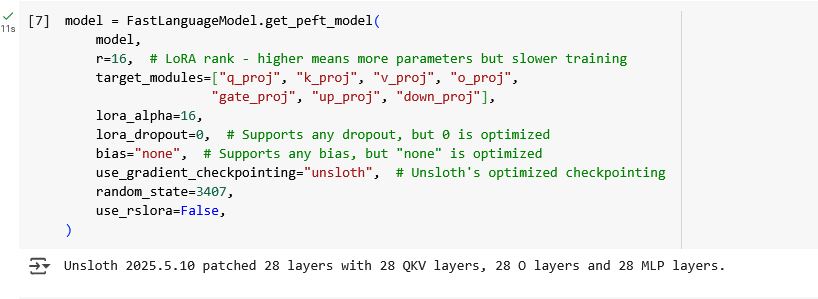
Configure LoRA for efficient fine-tuning:
model = FastLanguageModel.get_peft_model(
    model,
    r=16,  # LoRA rank - higher means more parameters but slower training
    target_modules=["q_proj", "k_proj", "v_proj", "o_proj",
                   "gate_proj", "up_proj", "down_proj"],
    lora_alpha=16,
    lora_dropout=0,  # Supports any dropout, but 0 is optimized
    bias="none",  # Supports any bias, but "none" is optimized
    use_gradient_checkpointing="unsloth",  # Unsloth's optimized checkpointing
    random_state=3407,
    use_rslora=False,
)
The LoRA configuration targets the most important transformer layers while keeping memory usage minimal.
4. Preparing the Alpaca Dataset
Data preparation is where most fine-tuning projects fail, but Unsloth makes it surprisingly simple. We'll use the famous Alpaca dataset, which contains 52,000 instruction-following examples.
Load and explore the dataset:
from datasets import load_dataset

# Load the Alpaca dataset
dataset = load_dataset("yahma/alpaca-cleaned", split="train")
print(f"Dataset size: {len(dataset)}")
print("Sample data:")
print(dataset[0])
The Alpaca dataset has three columns:
- instruction: The task to perform
- input: Optional context (often empty)
- output: The expected response
Format data for Llama 3.2's chat template:
# Llama 3.2 uses a specific chat format
alpaca_prompt = """Below is an instruction that describes a task, paired with an input that provides further context. Write a response that appropriately completes the request.

### Instruction:
{}

### Input:
{}

### Response:
{}"""

EOS_TOKEN = tokenizer.eos_token  # Must add EOS_TOKEN

def formatting_prompts_func(examples):
    instructions = examples["instruction"]
    inputs = examples["input"]
    outputs = examples["output"]
    texts = []

    for instruction, input_text, output in zip(instructions, inputs, outputs):
        # Handle empty inputs
        input_text = input_text if input_text else ""

        # Format the prompt
        text = alpaca_prompt.format(instruction, input_text, output) + EOS_TOKEN
        texts.append(text)

    return {"text": texts}

# Apply formatting to dataset
dataset = dataset.map(formatting_prompts_func, batched=True)
Create a smaller dataset for faster training (optional):
# Use subset for faster training - recommended for learning
small_dataset = dataset.select(range(1000))  # Use 1000 samples
print(f"Training on {len(small_dataset)} samples")
Starting with 1000 samples is perfect for learning. You can always scale up once you understand the process.
5. Configuring the Training Process
This is where Unsloth really shines – setting up training is incredibly straightforward. The library handles all the complex optimization automatically.
Import training components:
from trl import SFTTrainer
from transformers import TrainingArguments
from unsloth import is_bfloat16_supported
Configure training parameters:
trainer = SFTTrainer(
    model=model,
    tokenizer=tokenizer,
    train_dataset=small_dataset,
    dataset_text_field="text",
    max_seq_length=max_seq_length,
    dataset_num_proc=2,
    args=TrainingArguments(
        per_device_train_batch_size=2,  # Adjust based on VRAM
        gradient_accumulation_steps=4,  # Effective batch size = 2*4 = 8
        warmup_steps=5,
        max_steps=60,  # Increase for better results
        learning_rate=2e-4,
        fp16=not is_bfloat16_supported(),  # Use fp16 for T4, bf16 for newer GPUs
        bf16=is_bfloat16_supported(),
        logging_steps=1,
        optim="adamw_8bit",  # 8-bit optimizer saves memory
        weight_decay=0.01,
        lr_scheduler_type="linear",
        seed=3407,
        output_dir="outputs",
        report_to="none",  # Disable wandb logging for simplicity
    ),
)
Key parameters explained:
- batch_size=2: Perfect for T4 GPU memory
- max_steps=60: Quick training for demonstration (increase to 200+ for production)
- learning_rate=2e-4: Proven optimal for most instruction fine-tuning
- adamw_8bit: Reduces memory usage without sacrificing performance
6. Training Your Model (The Exciting Part!)
Here's where months of preparation pay off in just a few minutes of actual training. With Unsloth, what used to take hours now completes in minutes.
Start training:
# Show current memory usage
gpu_stats = torch.cuda.get_device_properties(0)
start_gpu_memory = round(torch.cuda.max_memory_reserved() / 1024 / 1024 / 1024, 3)
max_memory = round(gpu_stats.total_memory / 1024 / 1024 / 1024, 3)
print(f"GPU = {gpu_stats.name}. Max memory = {max_memory} GB.")
print(f"Memory before training: {start_gpu_memory} GB.")

# Train the model
trainer_stats = trainer.train()
You'll see training progress with loss decreasing over time. On a T4 GPU, this should complete in 3-5 minutes instead of the 15-20 minutes with standard methods.
Monitor memory usage:
# Check final memory usage
used_memory = round(torch.cuda.max_memory_reserved() / 1024 / 1024 / 1024, 3)
used_memory_for_lora = round(used_memory - start_gpu_memory, 3)
used_percentage = round(used_memory / max_memory * 100, 3)
lora_percentage = round(used_memory_for_lora / max_memory * 100, 3)

print(f"Peak reserved memory = {used_memory} GB.")
print(f"Peak reserved memory for training = {used_memory_for_lora} GB.")
print(f"Peak reserved memory % of max memory = {used_percentage} %.")
print(f"Peak reserved memory for training % of max memory = {lora_percentage} %.")
You should see memory usage around 6-7GB total, with only 1-2GB used for the actual LoRA training. This efficiency is what makes Unsloth magical.
7. Testing Your Fine-Tuned Model
Time for the moment of truth – let's see how well your model learned to follow instructions. This is where you'll see the real impact of your fine-tuning efforts.
Enable fast inference mode:
# Switch to inference mode
FastLanguageModel.for_inference(model)

# Test prompt
inputs = tokenizer(
[
    alpaca_prompt.format(
        "Continue the fibonnaci sequence.", # instruction
        "1, 1, 2, 3, 5, 8", # input
        "", # output - leave this blank for generation!
    )
], return_tensors = "pt").to("cuda")

# Generate response
outputs = model.generate(**inputs, max_new_tokens=64, use_cache=True)
generated_text = tokenizer.batch_decode(outputs)
print(generated_text[0])
Try multiple test cases:
# Test different types of instructions
test_instructions = [
    {
        "instruction": "Explain the concept of machine learning in simple terms.",
        "input": "",
    },
    {
        "instruction": "Write a Python function to calculate factorial.",
        "input": "",
    },
    {
        "instruction": "Summarize this text.",
        "input": "Machine learning is a subset of artificial intelligence that enables computers to learn and improve from experience without being explicitly programmed.",
    }
]

for test in test_instructions:
    inputs = tokenizer([
        alpaca_prompt.format(
            test["instruction"],
            test["input"],
            ""
        )
    ], return_tensors="pt").to("cuda")

    outputs = model.generate(**inputs, max_new_tokens=128, use_cache=True)
    response = tokenizer.decode(outputs[0], skip_special_tokens=True)

    print(f"Instruction: {test['instruction']}")
    print(f"Response: {response.split('### Response:')[-1].strip()}")
    print("-" * 50)
You should see coherent, relevant responses that follow the instruction format. The model should perform noticeably better than the base Llama 3.2 3B on instruction-following tasks.
8. Saving and Exporting Your Model
Your fine-tuned model is useless if you can't save and deploy it properly. Unsloth makes this process incredibly simple with multiple export options.
Save LoRA adapters locally:
# Save LoRA adapters
model.save_pretrained("lora_model")
tokenizer.save_pretrained("lora_model")

# These files can be loaded later with:
# from peft import PeftModel
# model = PeftModel.from_pretrained(base_model, "lora_model")
Save merged model (LoRA + base model):
# Save merged model in native format
model.save_pretrained_merged("outputs", tokenizer, save_method="merged_16bit")

# Save in 4-bit for smaller file size
model.save_pretrained_merged("outputs", tokenizer, save_method="merged_4bit")
Export to GGUF for deployment (highly recommended):
# Convert to GGUF format (works with llama.cpp, Ollama, etc.)
model.save_pretrained_gguf("model", tokenizer)

# Save quantized GGUF (smaller file size)
model.save_pretrained_gguf("model", tokenizer, quantization_method="q4_k_m")
GGUF format is perfect for deployment because it runs efficiently on CPUs, Apple Silicon, and various inference engines.
Upload to Hugging Face Hub (optional):
# Upload LoRA adapters to HF Hub
model.push_to_hub("your-username/llama-3.2-3b-alpaca-lora", tokenizer)

# Upload GGUF version
model.push_to_hub_gguf("your-username/llama-3.2-3b-alpaca-gguf", tokenizer, quantization_method="q4_k_m")
9. Troubleshooting Common Issues
Even with Unsloth's simplicity, you might encounter some common issues. Here are the solutions to problems I've faced hundreds of times:
Problem: Out of Memory (OOM) Errors
- Reduce
per_device_train_batch_sizeto 1 - Increase
gradient_accumulation_stepsto maintain effective batch size - Reduce
max_seq_lengthto 1024 or 512 - Ensure
load_in_4bit=True
Problem: Slow Training Speed
- Verify you're using a T4 or better GPU
- Check that
use_gradient_checkpointing="unsloth"is set - Ensure proper Unsloth installation with correct versions
Problem: Poor Model Performance
- Increase
max_stepsto 200+ for better learning - Use larger dataset (5K+ samples minimum)
- Verify data formatting is correct
- Try different learning rates (1e-4 to 5e-4)
Problem: Installation Issues
- Restart Colab runtime completely
- Use exact pip install commands from step 2
- Check Python version compatibility (3.8-3.11)
10. Advanced Techniques and Next Steps
Once you've mastered the basics, here are advanced techniques to push your models even further. These optimizations can significantly improve model quality and training efficiency.
Advanced LoRA Configuration:
# Higher rank for more complex tasks
model = FastLanguageModel.get_peft_model(
    model,
    r=64,  # Higher rank = more parameters
    target_modules=["q_proj", "k_proj", "v_proj", "o_proj",
                   "gate_proj", "up_proj", "down_proj"],
    lora_alpha=16,  # Keep alpha = rank for balanced scaling
    use_rslora=True,  # Rank-stabilized LoRA for better convergence
)
Multi-Epoch Training:
# Train for multiple epochs instead of fixed steps
trainer = SFTTrainer(
    # ... other parameters
    args=TrainingArguments(
        num_train_epochs=3,  # Train for 3 full passes
        # Remove max_steps when using epochs
    ),
)
Advanced Dataset Techniques:
# Use larger, higher-quality datasets
from datasets import concatenate_datasets

# Combine multiple instruction datasets
dataset1 = load_dataset("yahma/alpaca-cleaned", split="train")
dataset2 = load_dataset("WizardLM/WizardLM_evol_instruct_70k", split="train")

# Take subsets and combine
combined_dataset = concatenate_datasets([
    dataset1.select(range(10000)),
    dataset2.select(range(5000))
])
Performance Monitoring:
# Add evaluation during training
eval_dataset = dataset.select(range(100))  # Small eval set

trainer = SFTTrainer(
    # ... other parameters
    eval_dataset=eval_dataset,
    args=TrainingArguments(
        # ... other args
        evaluation_strategy="steps",
        eval_steps=20,
        save_strategy="steps",
        save_steps=20,
        load_best_model_at_end=True,
    ),
)
Final Results
After following this complete guide, here's what you should have achieved:
Training Speed: 3-5 minutes instead of 15-20 minutes (3-4x faster)
Memory Usage: 6-7GB instead of 12-14GB (50% reduction)
Model Quality: Significantly improved instruction following
File Formats: Multiple export options for any deployment scenario
Total Cost: Free on Google Colab (vs $20-50 on paid services)
The performance improvements are just the beginning. Unsloth supports everything from BERT to diffusion models, with multi-GPU scaling up to 30x faster than Flash Attention 2.
Most importantly, you now have the complete workflow to fine-tune any model on any dataset. Scale this process to larger models like Llama 3.1 8B or 70B, experiment with different datasets, and deploy models that outperform commercial APIs.
Conclusion
Unsloth isn't just an optimization library – it's a complete paradigm shift in how we approach LLM fine-tuning. By making the process faster, cheaper, and more accessible, it democratizes advanced AI development for everyone.
The workflow you've just learned works for any combination of model and dataset. Whether you're building customer service bots, code assistants, or domain-specific experts, this process scales to meet your needs.
But here's the real opportunity: while others are still struggling with traditional fine-tuning methods, you can iterate faster, experiment more freely, and deploy better models at a fraction of the cost.
Ready to fine-tune your next model? Open Google Colab, copy this code, and start experimenting. The future of AI development is fast, efficient, and accessible – and it starts with Unsloth.


